Download: ELS4 Pro -V9
Please note: The settings remain intact when updating the Software!
Changes in this Version:
- General code optimizations.
- Error in parameter menu for tapers and radii, there the finishing feed rate could not be set lower than 100%.
- Smallest steps of only one motor step with XSTEP or ZSTEP are now possible
- System hangup if the keyboard was pressed immediately after power on is now prevented
- New taper function: New cutting strategy that ensures that the drive spindles are always engaged during cutting.
Now cuts from left to right, so it drives to the left first before the cut starts. - New cycle: STRAIGH GROOVE! With this cycle, recesses can be made, with slanted or straight sides, e.g. to turn V-belt pulleys.
There are 8 standard V-belt dimensions available in the parameter menu (SPZ, SPA, SPB, SPC with 34° and 38°).
Furthermore, the angle of the sides can also be selected directly, between 0 and 180°.
The depth and length of the recess can also be freely selected, although these values cannot be changed for standard V-belts.
The width of the cutter and the cutter radius must be set in the parameter menu. Cutting must be done with recess / cut-off cutting, e.g.: MRMN with 2mm width and 1mm radius. - Angle-dependent interpolated feed calculation: The real feed speed on slopes (e.g. for taper and grooving) is now calculated using the taper angle and thus corresponds to the set feed speed
- The plunging into the material during grooving and grooving is done with the feed rate set in “PARTING”-mode.
Instructions:
- Download and open the ZIP-archive.
- Save the included file(s) to a micro SD card.
- Switch off the control unit.
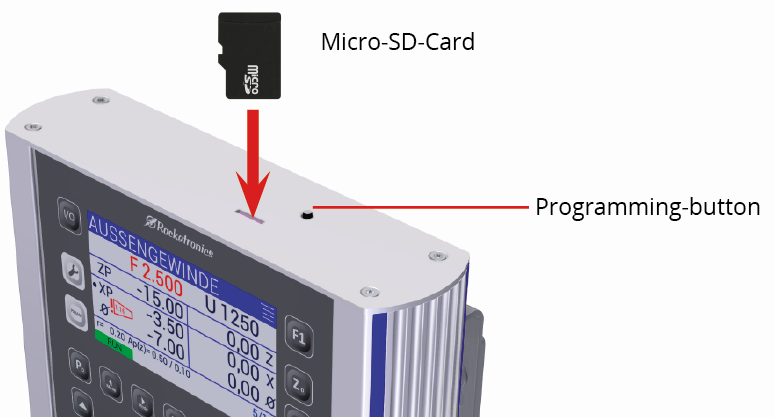
- Insert the memory card into the card slot on the top side of the housing.
- Press the small programming button on the top side of the housing and switch on the controller.
- Release the button again.
- The software is now loading, you hear a clicking sound. If everything works fine, the controller switches to the newly loaded program after approx. 6-8 seconds.
- After the restart you will eventually see a message that the flash content is updated, after a few seconds you will be asked to press the START button.
- As soon as you see the main screen the update is ready and you can remove the Micro-SD-Card.
You can use micro SD cards from 2 – 32 GB memory size, the card must be formatted with FAT16 or FAT32, NTFS or other do not work. The firmware file must be stored in the main directory, do not store it in a subfolder. The data must be stored in the first 2 GB of memory, if there is already more than approx. 1.5 GB of data stored on the card, delete it first and then save the update file on the card.