Download: ELS4 Basic-V13b
This is a BETA version that may still contain bugs. It has been extensively and thoroughly tested, but contains many changes, so there may still be bugs.
Please note: The settings remain intact when updating the Software!
Changes in this Version:
- The displayed positions now have 3 decimal places if the value is greater than -99.99 mm.
This allows a higher accuracy than before, where the position was always displayed with 2 decimal places. This means that the cutting depth can now also be entered with an accuracy of 0.001 mm, whereas previously only 0.01 mm was possible with the ELS4 Basic.
However, it should be noted that, depending on the motor steps and the spindle pitch, such small steps are not always possible.
For example, with a spindle pitch of 4mm and 400 steps/revolution, 1 motor step = 0.01mm. This must be sufficiently finely adjusted to be able to drive smaller distances at all. - For external and internal turning, facing and grinding/cutting off, the individual infeed depths are now approached precisely during roughing and therefore the selected finishing depth is always maintained exactly. In previous versions, the individual cutting depths fluctuated slightly due to rounding effects.
- Cycles are now only started if the spindle is running when the START button is pressed. If the spindle is not running, pressing START has no effect, even if the spindle starts afterwards.
- Fixed an error when selecting the number of infeeds where turning the knob after exiting the selection screen could cause the data to change.
- The minimum step size for step-by-step processing is now 0.001mm (previously 0.005mm).
- When selecting the number of cutting passes, it is now possible to change the number of finishing passes directly by pressing and holding the FN button with the rotary knob. The number of roughing passes and the finishing thickness are recalculated automatically. The step size of the change can be reduced from 0.1 mm to 0.01 mm as usual by pressing the push button.
The new value for the finishing pass is saved permanently and is then also available in other cycles. It should be noted that there are values for the finishing infeed in X and in Z.
For example, facing and drilling use the finishing infeed in the Z direction, while the other cycles use the finishing infeed in the X direction. - The error message “Distance too short” has been corrected; a warning is now issued if a value for ZP or XP is positive instead of negative. The warning “Distance too short” now only appears if the distance is actually too short.
- A factory reset of the settings will now safely switch off the control unit. The settings are reset when the operator switches it back on.
- The up/down buttons for parameter selection switch off step mode (XSTEP/ZSTEP).
In the settings under SETUP DATA -> X WAIT POSITION and Z WAIT POSITION, a position of up to 1000 mm can now be entered in 0.1 mm increments. The wait position is approached after an operation.
A new feature is that both axes are moved at rapid traverse to +0.2mm in front of the material before the cut is started. Previously, the axes were moved there slowly, now at rapid traverse.
This means that larger distances can now also be entered as a waiting position, which is desirable in some cases. For example, by entering a large value for Z WAIT POSITION, you can move the Z-axis far away after turning the thread in order to check the thread. During the next cycle, the Z-axis is then moved back to the start position in rapid traverse, so that hardly any time is lost. - The roughing infeed is now saved in all cycles after the start of a cut and used to calculate the number of infeeds for a new cut. This makes it possible to always work with the same roughing infeed or the same number of infeeds. This enables faster work. However, the saved values are deleted when the control is switched off.
Exception: This function is not available for thread turning with radial infeed. - Fixed an error in the parameter menu display.
- Display changed so that lengths > 999 can be displayed.
- When using the handwheel, the travel speed of the 4 travel buttons of the handwheel can now also be set in the settings under (9) Extension -> Step mode.
Step modes 0 and 1 move quickly, with the FN button pressed, they move slowly.
Step modes 1 and 3 move slowly, fast when the FN button is pressed. - The ENABLE signal for the motor drivers can now be inverted. This is possible in the settings under Outputs -> INVERT ENABLE SIGNAL. The default setting is NO, which is suitable for the usual drivers from Leadshine or for JMC motors. Some drivers can be changed by software, in which case it can also be inverted in the controller.
The advantage is that the motors are then enabled when the controller is switched off so that manual operation is possible.
In the external turning, internal turning, facing and parting off without end point modes, it is now possible to stop a running cut at any time with PAUSE or START and resume it with START. - EXPERIMENTAL: The units can now be switched to INCH. Menu 8/9 Information, last menu item. After switching over, a factory reset is necessary; ALL settings are reset to the factory settings!
There are a few sttings where you cannot set values fine enough, we work on that.
Attention, this extension is not yet 100% tested, use at your own risk.
Instructions:
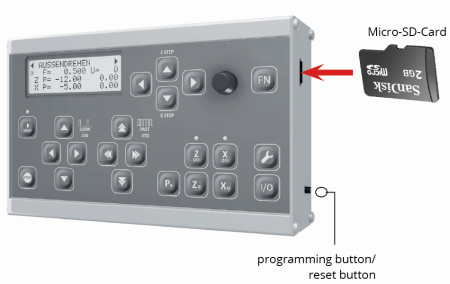
- Save the included files to a micro SD card.
- Switch off the control unit.
- Insert the memory card into the card slot on the right side of the housing.
- Press the small programming button on the right of the housing and switch on the controller.
- Release the button again.
- The software is now loading, you hear a clicking sound and LEDs 2 and 3 flash alternately. If everything works fine, the controller switches to the newly loaded program after approx. 8 seconds.
You can use micro SD cards from 2 – 32 GB memory size, the card must be formatted with FAT16 or FAT32, NTFS or other do not work. The firmware file must be stored in the main directory, do not store it in a subfolder. The data must be stored in the first 2 GB of memory, if there is already more than approx. 1.5 GB of data stored on the card, delete it first and then save the update file on the card.