Download: ELS4 Basic-V6
Changes in this Version:
- Support for external handwheel with rotary encoder: A handwheel can now be connected to the SUBD connector on the rear panel.
A suitable additional board “handwheel extension” is available in the shop and allows the use of all push buttons in an external control unit.
The ELS4 Basic has also been equipped with new push buttons via this interface, including XSTEP and ZSTEP, which activate the stepping mode of the axes.
In addition, a dedicated button for the parameter menu is available via the handwheel interface.
In addition, a rotary encoder can be connected, with which the axes can then be moved. This can be done both in steps (in 2 steps) and in motion (also in 2 speeds)
The backlash of the axes is compensated, so that you can feed very precisely.
The reaction of the system can be adjusted to different encoders and can be adapted to your own wishes. For this purpose the settings menu has been extended by a new section.
Among other things, the threshold from which the system switches to continuous operation can be adjusted or switched off completely. For more details see the manual of the extension board. - In Gearbox L and R mode there is now a parameter menu where you can activate a “coil mode”.
This simple coil mode allows the winding of coils. The spool mode is activated immediately, so when the spindle rotates, there is an immediate movement.
No start command is necessary! ZP sets the length of the spool, F (feed) the width of the wire. The number of windings and the number of layers are displayed.
If the parameter “X REVERSE” in the parameter menu is activated, the X-axis is retracted by the amount of the wire thickness (F, feed) after each layer.
GEARBOX_L winds from 0 starting to -Z (to the left) and back again, GEARBOX_R winds from 0 starting to +Z (to the right) and back again. - In gear mode, the X-axis can be deactivated with XOFF before starting, so that manual feed can be performed during travel.
- The movement of the axes within the settings mode is now locked
- Adjusting values with the rotary knob is now blocked while the cycle is running.
- On new delivery, the “finishing feed rate” (in the parameter menu) could be set to 0, which caused errors in some functions
- Various key locks activated during a running cycle to prevent accidental triggering of functions
Anleitung:
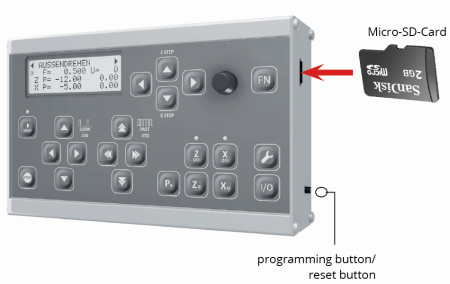
- Save the included files to a micro SD card.
- Switch off the control unit.
- Insert the memory card into the card slot on the right side of the housing.
- Press the small programming button on the right of the housing and switch on the controller.
- Release the button again.
- The software is now loading, you hear a clicking sound and LEDs 2 and 3 flash alternately. If everything works fine, the controller switches to the newly loaded program after approx. 8 seconds.
You can use micro SD cards from 2 – 32 GB memory size, the card must be formatted with FAT16 or FAT32, NTFS or other do not work. The firmware file must be stored in the main directory, do not store it in a subfolder. The data must be stored in the first 2 GB of memory, if there is already more than approx. 1.5 GB of data stored on the card, delete it first and then save the update file on the card.